Wednesday, February 27, 2013

Class 160: Harriet's Double Nine Patch Chain Project Quilt

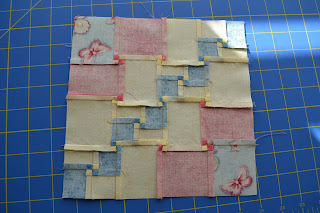
Here is Harriet's Example Quilt
There are two different 9 patch blocks in this quilt. Only 3 fabrics.  Projects are getting more complicated and a little more time consuming, so I'll be breaking up the project into chunks for the blog. Otherwise, posts will be farther between, and too long!

Here is my fabric choice:
The paisly dark fabric will be the border and the large 9 patch block squares (Block B).
The greenish yellow is my background "tan" replacement.
The tonal blue is the small 9 patch chain blocks (Block A)


Making Block A
1. Make 2 different strips and cut 1 1/2" and assemble the middle block
2. Make 2 different strip sets to assemble modified 9 patch

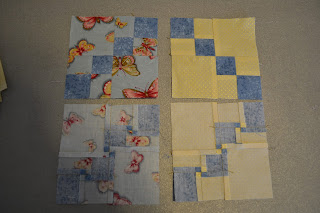
Here are the 3 different assembled 9 patch blocks.
Next step was step 9: "Now add the solid squares to the Chain blocks".  Well... interesting that we don't get any info about those. Usually we get specific instructions :)
Of course, I can see that there are 4 in the example Block A.
And, I count 12 blocks in the quilt, thus I need 48.
Ok. What size? Hmm.. My other blocks measure out to 3 1/2, so I must need them to be that same size...
How many strips is that? 48x3.5=168"/42" length =4 strips.
So, 48 squares are done!

How about I lay them out now in piles as shown in the example:
Each stack has 12, since I'm constructing 12 blocks A's.
And, now I'm ready to sew together my Block A's!

I think they were just trying to trick me into doing some of the calculating myself, getting me ready?

Next step is to sew Block A's
and then...
Stay tuned for Block B


Tuesday, February 26, 2013

I've Been Shopping

There has been a list of items on my want list in order for me to move forward. I've been busy selling extra stuff around the house on Craigslist, and it is all being reallocated to the quilting fund.
Package 1 arrived today:  This is my new thread.  I ordered from Harriet's Treadle Arts. 2 Nylon cones for practicing my quilting along with a few thread sleeves, and 1 Presencia 60/3 in light pewter.  I was thinking the pewter would have been lighter, but it's good anyway. I'm curious to find out if my seam measurements stay the same... 

Package 2: I ordered these from JoAnn online. Since they are made by JoAnn, I would have thought they would carry them in the store, but apparently they are available online only. These gloves are recommended to help hold onto the quilt as I quilt the layers. At least I had a free shipping coupon. I would have rather used the 50% off coupon at the store :)
Ebay Purchase:  Bobbins (and single hole throat plate) purchased for my Pfaff machine. I've been using Signature pre-wound bobbins that match my thread cone. They work great because they last much longer, and I've not needed bobbins or to wind my own.  Now, with the new thread, I'll be winding my own.


WalMart Errand:  These I purchased at the store for storage of fabric. They fit nicely under my cutting table and in the closet. The wheels on the wood floor make them especially easy to access. I attempted to re-purpose 2 of these that currently have loads of LEGO's, but there just doesn't seem to be a better way to store all those little pieces. So, I got new containers.

And, I've been working on the next project. It's the Double Nine-Patch. Just a teaser :
I've finished the 12 small 9 patch blocks. The 4 stacks on left equal 100 pieced units cut and the 2 stacks on the right side are 50 all cut 1 1/2" and ready to sew together.

I have more fun items shipping from Amazon. Stay tuned :)


Sunday, February 24, 2013

Precision!

I Found My Line


Ok, I'm back to piecing again :)

I must have spent HOURS attempting to get my 1/4" seam to work out.  After I replaced my throat plate with a single hole vs. the zig zag plate I had to move my needle back to the 0 position. This threw off my entire system because I had learned to get my precision by adjusting the needle.

I attempted to just move the tape over because my seam was off 1/8" from seam to edge and a full 1/4" from edge to edge of 2 strips sewn together.
I never could find the right place, and I tried and seam ripped that strip at least 4 times ( It was a full strip I used from both ends). =8 times?

After some room cleaning therapy and a good night's sleep I renewed my enthusiasm for getting this correct and went back to my machine this afternoon.

  1. I got out my graph paper and ran the line until I got it exactly where I wanted it.
  2. I found some masking tape and razor blade in the garage and cut a chunk out of the roll 1/4"w x 4"Lx 1/4" thick and stuck in right next to the graph paper edge. Then I put my red tape on top for visual help.
  3. Ran my test strip through, pressed and measured. I was still just a fraction off.
  4. Moved my tape over just a smidge.
  5. Ripped seam again and reran through the machine, pressed and measured.
  6. Still not right. Measured my strips and I swear my ruler is not the same if measuring vertically and horizontally!! I recut new strips. Repeat again. 
  7. Got it!


I am SO pleased with the results.  I've never had the inside square AND all edges measure with absolute precision all around! Well, I had them good, but it wasn't this easy.
And, it wasn't just this one... All 12 of my little 9 patches are just right :)

I guess it was worth it. I just didn't like the process of getting there.
I must say though, I am really happy with the tape strip running in front of the needle.  I didn't have one before because I used the edge of my 1/4" presser foot. I had to really concentrate on watching it go under the foot.  Tape makes it so much easier because I just have to watch my fabric running along the tape and I'm not even really looking at the needle anymore.
Is that the way it should be?
Anyway, crisis is over. I'm back to sewing. Just in time to go back to work tomorrow morning :)


Saturday, February 23, 2013

I Messed Everything Up

I received my new single hole throat plate on Thursday, and being so excited about my new item I promptly installed it. 

I had to move my needle back over to 0.

Since I had just finished cutting my fabric for the next project, I was ready to start sewing...
For some reason, I figured I could just move my guide line over that 1/8th inch and be on my way.
I sewed 2 entire strips, ironed and starched and then measured.  OOPs.
Error #1. I should have done a test piece. Duh, you say?  Yeah, me too.

So, I got out a couple test strips and started on my quest to find my new guide line. 
I CAN'T FIND IT.  No matter what I do, I can't seem to figure out where to get my 1/4" seam to measure out properly. 
After running about 4 strips through with various adjustments along the way, I'm not any closer.
1. I'm finding that my quilter's 1/4" presser foot isn't really a good guide, and I have to be on the inside of the foot.
2. I can get one side to measure fairly accurately, but the side that is being ironed over is shorter.
Does that mean that my thread is indeed too thick? 
3. I've ordered the 60/3 Presencia Thread that Quilter's Academy talks about, and maybe that will solve my issues, but it won't arrive for DAYS yet  :( And, how come that wasn't a problem before?

I feel like I had finally gotten fairly reliable accuracy and now I will be starting all over.

Error #2, Don't fix what ain't broke.. At least that's what I've been told.  Why did I feel I needed to take this next step?

So, what does one do when not able to continue?

I'm cleaning out the closet of my quilting room, and making room for MY stuff, of course.
Sleeping bags, photo boxes, photo albums and scrap books, guitar and amp, and other misc. things. It's all cleared out and now... I have room to start storing a fabric stash!  

I'm reading intently the Machine Quilting book. Maybe I'll get far enough that I will venture into doing some practice swatches. 

And, I've decided I'm going to start saving all those little pieces of scraps in bins.  I have a notion in my head that I can use them for applique, and scrap quilts some day. After I get a good handle on what I'm doing and I feel like I know more about how to piece, I can venture into something scrappy.   Scrappy has always appealed to me because it doesn't seem to be so color coordinated, which I am definitely challenged with, and it fits with the re-purposing way of life I find myself  usually following.

Anyway, I'll be here reading about all those others who are actually quilting until I can get over my hump in the road.

Thursday, February 21, 2013

160: Lesson 4: Interlacing Circles

Interlacing Circles is a project designed to continue our precision piecing while working on something incorporating almost all the techniques learned to date. Here the pattern looks complicated, yet is simply a combination of rail fence blocks, nine patch blocks, and solid blocks.Here is the sample as shown in our assignment:
 This quilt required  a dark red, dark pink, paisly, and cream fabric.

My husband and I were out running errands together and I slyly stuck in a trip to JoAnn's. My dh was patient with me last time, and he is good with colors, so I convinced him it was an easy in and out.  (hahaha). Well, we couldn't find what we were looking for, or even close, in reds. In the mean time, our cutting number was coming up (because this time, he knew the routine... walk in, go get the number, then start the fabric hunt :)  He went over and traded his number for a later number with another man waiting in line :)  When our number came up again, and we were STILL not ready, I told him not to worry, they'll work us in anyway..

Back to the fabric hunt.  I decided to change to an Orange color scheme when I looked over to a fabric bunched together in another spot and they just looked cheery!

Dh informed me that we still didn't have a good "cream", but I decided I liked the cream with the flowers too much to go plainer. Besides, we couldn't find one with more cream, less color.   And, that was my favorite of the bunch!

We hurried over to the cutting counter, and found we were only about 5 numbers behind.... And, the nice lady at the counter worked us in next :)

Turns out when I went to align my fabrics, the light orange felt SO different.  I'm hoping it is 100% cotton, but is not tightly woven and is thin, thin, thin. I was worried it wouldn't sew nicely up against the other fabrics.  Turns out, it was a bit of a problem.  I will have to Slow Down when in a hurry to get some fabric and move along on the errands!

Making the blocks was simply an exercise in getting it right, because there was nothing really new here.  Assembling the top on the board took more time, as the pieces had to be placed just right.
When I got done, I was missing one piece and had an extra of another.  I looked carefully, and couldn't see that I had anything wrong, so I cut another rail fence of the one I needed, and started looking again, and THEN saw where I had swapped the pieces. These type of configurations really need several different looks.

Here is a block:

And, here is the finished top sans the border in cream.


Maybe a little busy?  But, I think it still works. I didn't lose the circles anyway! Had I gotten a cream color that wasn't so busy, I think it would have been a perfect Orange colorway substitute for the Red.

This week, I've been working on upgrading my quilting space.  My little sewing desk isn't big enough to hold up the quilts. I need a place for them to go after they go through the needle. So, I picked up a small 4'x2' folding table at Costco. It will work just fine as a resting place for the piecing and quilting.

I also searched the internet for a cutting table and came up with NOTHING :(
I've currently got a 72"x30" folding table that also folds in half.  It is also from Costco a long time ago. I have an issue with the "folding" crack in the middle of the table. It can be felt through the cutting mat, and I am always having to rearrange my fabric to stay away from the hump and crack space.
I must be able to disassemble for when guests come. I was hoping there was some great product or inspiration online, but just couldn't find it. Then, I went to JoAnn's and they had a "craft/hobby" table.  Not much info about it on the box, and no display.

They lady reminded me that if I didn't like it, I could return it, no problem. (Must have receipt within 90 days, blah, blah, blah)

I should have checked JoAnn's online.  I wonder why this table didn't show up when I did searches?

So, I got it, came home yesterday and spent 2 hrs putting it together.  All to find out that it sits on wobbly spindle metal legs with wheels that rock back and forth.  Ugh.  When I went to look at reviews to see what people said they did to fix it, all I found were 0-2 stars with almost everyone saying that they returned it, wished they returned it, or it broke within months.  I could just kick myself. It is so unlike me to not check first. And, although I did consider checking reviews BEFORE I put it together, I decided I wanted to make the decision myself since it was returnable anyway.

My dh got out his drill and the thing was disassembled and restored in the box within 10 minutes!
My chore for the day, to return it.  I'm disappointed, because it was the perfect size for the room, could fold down for space saving and rolled so I could move it around in my small space. Oh well.  Back to my table on wood blocks with a crack and hump down the middle.

Any brilliant ideas out there?

Monday, February 18, 2013

Class 160: Sampler 9 Patches

I've decided to move along with the next class rather than dwell on the fact that my pieces in the last project didn't turn out as well as I hoped.

I did, however, make some decisions:
  1. I have ordered a straight stitch throat plate for my Pfaff 2040.  I'm hoping this will help in accuracy, as it is highly recommended. Of course, then I can't have my needle moved over +1 which will definitely cause me to readjust all my "lines".
  2. I have put a piece of tape along the front of my walking foot as a guide, to help steer the fabric along in a straight path. I already don't like it, because now I can't get into my bobbin box unless I peel back the tape.
  3. I am seriously considering switching to the 60/3 cotton thread recommended, at least to try it out and see how it compares to my Signature 50/3. I do have a terrible time with fuzz all over in my bobbin case from my current thread choice. The 60/3 is supposed to be thinner and lends to a more accurate seam allowance without having to move my needle over, and less fuzz?
  4. I have purchased Harriet's Machine Quilting Book and am working my way through the front information part, in anticipation of starting to practice some quilting before the end of the next class! I've only got this class and one more before the class where I start putting the borders on the current projects and start quilting! 
I purchased this book from Amazon.  Do you see the problem? This is the 4th Ed. My 3rd Edition was spiral bound, mostly black and white. This one is paperback!  The pictures next to the item were spiral. I got this and went to the quilt store and checked it out. Theirs is spiral bound.  How come the Amazon edition is paperback??  This 4th Ed. is a huge improvement in progression, tips, organization and implementation.  I think they attempted to model it after the Quilter's Academy even though it doesn't actually have lessons.  I'm going to attempt to get a jump start on my quilting lessons before I get to the final class in my current year, because the class doesn't actually give that much detail. It refers to this book! I'm just disappointed that I got a paperback. 

And, I did do the current assignment.
Lesson 1 and 2 are all about fabric.  A couple weeks ago, while waiting for fabric to arrive, I read these lessons at least 3 times.
Lesson 3 is constructing small 9 patches for our sampler.
Here are my 12 blocks, attempting to lay flat against my upright wall board.  They actually are all square and perfectly measured!  I pressed in a different technique than last assignment.  This time, I pressed along the seam line while attempting to keep the seams in the back going in the same direction that I had fanned the seams, so I wouldn't have to attempt to iron with my point each individual square. I think it worked better.

My challenge was again with pressing though!  This time, my Faultless Heavy Starch scorched all over, and it left flakes everywhere.  I didn't change the settings from any of the other times.... It's the weirdest thing! I've noticed it does this a little on my previous assignments, but this time it was heavy.  Can you see it if you click on the picture for the full size?  It's everywhere!


Saturday, February 16, 2013

Class 150: Harriet's Town Square Quilt project

This is the project as shown in the book:
Again, I went to Ebay to find my fabric for this project and this is what I came up with :

 I think this time, I picked something very close to the original. My plan was to stick with something as close as possible so I can learn how to get it right, rather than end up with stuff I don't like.. I'm still not the same green color scheme LOL.

Step 1: Assemble smallest blocks first, which are done with strips.
  
 Since there are 2 blocks, there are 2 different sets of strips.

 And, They measure perfect!  I slowed WAY down and wanted to get these right. I pressed carefully.


The fun part was fanning the seams.  I've never made such small blocks before. They came out excellent!


Step 2: Making Blocks A & B:
Starting with adding the "squares" to these smallest blocks. I had to read the instructions several times before I understood what was happening. This was a very unique way of adding squares!  It's for sure a faster way, but I can also see how much more precision we gain by doing it this way. Take a look!
Yes, I sewed my little blocks to more strips! Now, had my little blocks been off just a little bit, I would have LOVED how I could have "fixed" my mistakes by using the precise lines of the strips to be sure to make my blocks were square. But, my blocks were already square and measured just fine! The only thing I had to watch out for here was to be sure to keep them close enough so that I didn't run out of strip.

After sewing, Then, I cut between them to separate them, then used my ruler which was 2 1/2" and cut both sides to trim up to exact measurements. Going sideways allowed me do this without problems. When I tried to go up and down, I wasn't ambidextrous enough! I figured if I moved the ruler, then I wouldn't necessarily have them exactly measured. It worked just fine!


Here Blocks A & B are together and fanned. Somehow after all the perfect measurements, I'm no longer perfect?  Pressing stretch, maybe? I did have a hard time figuring out how to press individual squares rather than pressing along a whole seam line. I found myself constantly turning my iron back and forth, or flipping the squares, because every other square's seam goes in the other direction.

Next is to make 32 Four Patches. These are larger.  And, they measure fine after pressing.

Still fanning all the seams!
 2 finished squares on the board.

And, TA DA, the finished top!
The strip on the right side is showing border fabric, although I forgot to lay in the darker blue for the inner border. I just wanted to get an idea of what it will look like when borders are attached.  I really like how it turned out. It's pretty, and I liked working with the fabrics this time!

I am still not sure how come my squares ended up a bit on the small side, especially my tiny 4 patches. I know those measured perfect at the beginning. I ended up adjusting my "1/4" seam rather than seam ripping :(  I know, I know... sssssshhh.  I just couldn't fathom ripping seams of all those fanned intersections, pressing them flat again to try assembling them again. 

I haven't decided if now I want to do the Asian Nights larger version of this to practice my pressing such small patches or not.   I'm not happy with the precision, even though everything measured perfect after sewing individuals. I'm fairly certain it is the pressing of the blocks to get seams to fan that is my failure.

Anyway, this project took 2 weeks.  I didn't get that much time put in on it due to LIFE, but progress is all good.

Happy Days!


Thursday, February 7, 2013

Re-visiting the Table Runner project

Carrie Hargrave called me on the phone!

Yes, I emailed Quilter's Academy authors asking for clarification on the instructions for my diagonal ends and torn edges not aligning. (previous blog post)  Here is the response...


1.  Sewing the 4 pieces together to attach to the end of the table runner IS in the weird manner than the seam allowances are on the outside of the seams. Here is the picture after I sewed them on..


Then, I attached to the end of the table runner... and did the cutting 1/4" away from the corners.. Sure enough, the floppy seams SHOULD hide in the seam allowance when I put the border on.  I have one corner though that looks like I might have an issue later.

And then I put the floral print under to get an idea of what it will look like when I get to really finish. (Later when we attach borders)

Although I still really like the floral, I'm still not crazy about the rest of it. oh well.


Which makes me wonder....how many others find the learning curve of picking fabric to be challenging? 
I find quilting an interesting craft.  Some people are naturally crafty.  They hardly notice the ability to choose colors is a challenge for some. A learned skill.  Then, there is the math side of quilting.  It is tediously precise sometimes.  Do the people who are less color challenged, find it more challenging with the rules of preciseness and constantly measuring seams?

Anyway, back to my conversation with Carrie.

2. When I tore my fabric to align the grain, I was able to fold selvage to selvage without a problem.  Edges lined up. But, when I folded the bottom fold up to the selvage, it was off.  This was her basic answer..
 ...Sometimes, aligning fabric will come once after the first fold.  Sometimes, it will align fine the first fold, and be off on the second fold.  Sometimes, it will be off both times!  Align the fabric with the starch the same way each time, being patient and slow and it will align.
HA. Who would have thought that once you get the grain line to work in the first fold, you would have to start over again for the second fold?

Anyway, I was absolutely amazed that the response to my email was an email requesting my phone number because it was easier to just talk through the problem!   Thank you to the Hargraves for making this home class so accessible to everyone!


Sunday, February 3, 2013

"Completed" Table Runner

Here is the assignment from the book:


Here is my runner as it lays on the board:
I'm still hoping to figure out how to attach the pointy ends, otherwise my runner will end up short. I will probably send an email to Quilter's Academy and update you all later. I'm disappointed that I didn't choose a lighter value green. This darker green, although it is a fine match with my floral, is too dark, and brings out the "square" too much as compared to the example in the book.

As always, we attach borders later.  This border will be in the same print as the large floral.

I also took note of what to watch for when sewing my rows together.  Harriet talks about making sure that you send the raw edge of a butted seam through first, when you can. Like this:
I found that the seams running this way push the corners into each other better than if the raw edges are running down the same way I'm sewing. Which is why I think I had the untidy corners.  The problem is... every other row is always running the wrong way!  Those rows take extra care.

Lessons learned on this project:
  1. Read the entire lesson for the project before starting anything.  I didn't realize until way late the key words, "if you decide to create the diagonal ends..."  as if there was a choice! 
  2. Mock-ups shall be done in real fabric from here on out.
  3. Pay attention to which way seams are running. I may want to sew from different ends, not simply in order top to bottom in same direction each time.
  4. Steam helps set the seams.
  5. Unpicking sewed seams takes time and is no fun.
Next lesson is another project!

I think that this particular project is a bit ambitious for Year 1!  There is so much going on with different angles.
Update:  See my post on trying to finish this thing!  THIS IS WAY TOO HARD AS WRITTEN.

Saturday, February 2, 2013

Class 150: Project Table Runner

My fabric arrived! Unfortunately I felt so underwhelmed that I carried the box to the sewing room, looked at the fabric for 2 minutes and went back to bed.  I must have been sicker than I thought because I would not have guessed that after waiting almost 2 weeks to get to this next project, that I would rather sleep.  Now, I'm feeling better and have set myself to sewing.

The mock-up from lesson 5 was first on my list.
First thing I did was make photo copies of the fabrics, which didn't work so well. It used ALOT of ink, and the colors still didn't turn out correct. The solid "brownish" strips in the rail fence are actually a green. The center squares are black, and the 2 other squares in the 4 patch are a solid tan. UGH.  So much for getting a real idea of how these fabrics will work. But, I like them when I lay the fabrics together, and since this is what I have I will continue! Note to self: next time just cut the real fabric for the mock up. Here is a picture of the fabrics together, even though they still don't show well. My camera is away on a journey, so I'm using the ipod here. I find it moves when I snap the picture. Sorry, all these photos will look a bit blurry.

Next step was to press and align the fabrics.  I was doing fine until I came across one fabric where it seemed that when I had my torn edges and salvage aligned in the first fold, it appeared that the torn edge bows inward. Sure enough, when I fold the fabric again there is NO WAY I am going to get my torn edges to meet and still have the top edges straight.  How can that be??  Has anyone ever torn fabric where it bows like you were rotary cutting badly?  If it is terribly off grain before we tear it, wouldn't that mean that when we cut at the fold, it is NOT going to tear straight?  Please leave comments!

The floral fabric was purchased in a 1 yard increment, and when I folded it after ironing out the center crease, there was no way this fabric was going to align.  I've never had to "work" a fabric this far. It had at least a 1" fold half way down.  I went back to the book and re-read about re-aligning fabric. I cut the yard in half so I would only work with 1/2 yd at a time and got out my pins. I pinned the salvage together and worked from there down and toward the center and what a surprise!  After a good 15 minutes of being very gentle and patient with my iron and fabric, I got it to re-align the grain so that all edges are straight. I had never had something so far out of wack, so this was a first and came out well.  Here's a case of "trust Harriet, it works!"

Here is a picture of the work in progress:
I've gotten better with keeping all the attached lines moving through the needle, somewhat.  I also have found that using a paper weight to keep my place on which row I'm working from on the right side helps.

I'm not feeling the excitement with this project.  I think the colors just aren't that exciting. I really like the floral pattern.  It was what I was looking for at the quilt shop, but couldn't find anything close.  The patterns work. I have a floral, solid, 2 tonals, and small print. I'm thinking the green tonal should have been lighter?  And, I think I just have a preference to more colorful fabric.  This is.... blah. I'll chalk this up to learning experience.

After I completed sewing all the blocks into rows, I found the next step was to sew the end pieces. This is not a square runner, it has nice points at the ends.  I've noticed others doing these projects have omitted the pointy ends, so I'm anxious to see how it turns out.

I sewed the line of three down, but can't get the end piece to sew on. As you can see, I would be sewing right over my seam lines and the edges would be "out there" flopping around.


And, If I sew the end piece on first it will obviously give me the same problem with overlap outside the seam allowance on the top and bottom seams. 

The instructions do NOT get me the corner units as I would envision they need to go. There is no explanation as to how it should look different than normal. ie. "notice your seams are not all tucked under" etc...  I don't think that when I cut the diagonal that it would get sewn inside the seam allowance..??


I do not have sewing experience.  I've enjoyed quilting because it is not like sewing patterns. I am stumped because clearly there is some assumption here that I'm not getting.  Anyone out there with some clearer instructions?  I think I know why others made it square!  We have not been given lessons on this kind of piecing yet.

In the mean time, I went to sew my rows together, and I've not yet had this problem either!!
My blocks are not meeting up in the corners.  Since I don't feel like seam ripping at the moment, I think I'll go find something else to do for my Saturday afternoon!